User Module
The user module can be access via clicking on Admin > User Module.

User Module - Button Basics

Use this dropdown to search through existing user accounts. You can search by username, first name, last name, and role
The “copy” button saves all the rows in the table to your computer’s clipboard. You can then paste them into another program like Word or Excel
The “save” button allows you to save the rows to .csv or .pdf
Use this dropdown to select which location the account(s) you are searching for belong to.
Reminder: If you can not locate an account you are seeking you might want to select all locations in this dropdownThis is the all person search. You can find “persons” who have imported from your SIS here to create a user account with. Persons with an asterisk beside their name indicate that a user account exists for that person. Persons are bits of data that have imported from the SIS into clevr via the integration which include all staff, students, and locations. A user account is a person that is able to log into clevr. All user accounts are tied to a person, but not all persons have user accounts.
Adding a User via the All Person Search
Within the all person search, type in the name of the staff member you are looking for. This data is pulled from your Student Information System (Maplewood, PowerSchool, Tyler, Follett, etc). If you make a typo when typing the staff member’s name you must start again. Persons who have an asterisk beside their name (IE: Amanda Helps*) indicates that they already have an account created.
To begin creating a user account, locate and check the “Create User Account” checkbox. This will allow you to turn a person into a user account.

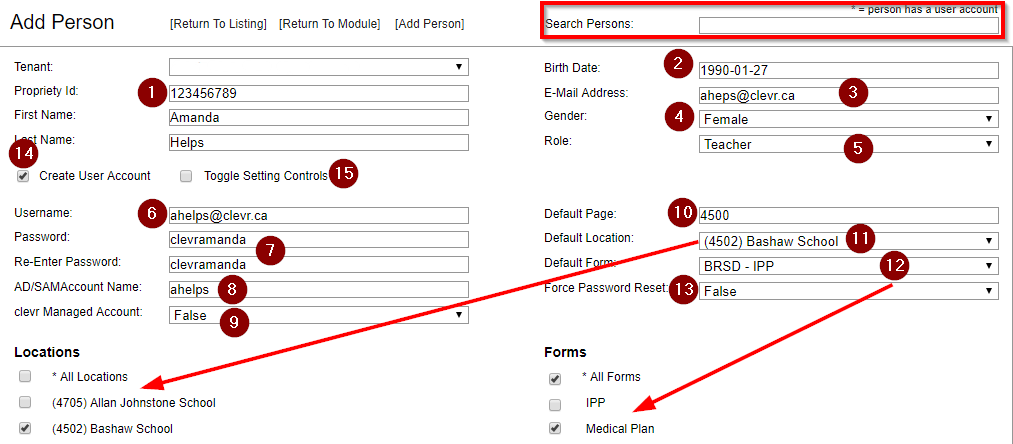
Proprietary ID: This will be imported from your SIS. In Maplewood this field is the teacher or student code, in PowerSchool this is the DCID number. If the user is a teacher and you are using a classes implementation, this number MUST match their staff number in order to be able to access their students. With SSO, you can not use 999.
Birth Date: If the person has a date of birth registered in your SIS it will import into this field. If the DOB field within the SIS is blank this field will either be blank or have a value of January 1st 1900. This field is not mandatory and can be left blank if desired.
Email: This is a mandatory field. If there is an email address in the SIS for the staff member it will import here. If not it will need to be added. We recommend adding only district email addresses for security purposes.
Gender: Not mandatory but you can add it if desired.
Role: The user’s role is what determines the user’s access level in clevr. Use the role spreadsheet supplied to you to determine which forms a role has access to.
Username: We recommend using the district email as the username. Some districts with active directory implementations have specific user account requirements. If you are on an active directory implementation the username convention will be supplied to you by the clevr team.
Password: This field sets the clevr password. If your district is on an active directory implementation, users will not need to know this password to log in, they will use their district password. We recommend using clevr+theuser’sfirstname as the default password so that all new accounts do not have the same password. If you are on an AD implementation you can insert something randomly generated as this will not be used to log in.
AD/SAM Account Name: This field is for districts on an active directory implementation only. Enter the user’s AD/SAM name/CN Name here. When this field is blank a user will not be able to log in via AD. If you are unsure what this value is, there is a nightly routine that populates this value into all user accounts.
clevr Managed Account: Set this value based on the roles spreadsheet supplied to you by the clevr Support Team. It is very important to ensure this setting is appropriately configured for every user account.
Default page: This defaults to 4500 and should not be modified unless your district uses a Dashboard landing page implementation. If using the Dashboard, this should be set to 950.
Default location: The location a user is associated with. Use the checkboxes below these fields to select all or multiple locations if required.
Default form: If a user has multiple forms, this is the default page they will see when they log in. Use the checkboxes below these fields to select additional forms if required.
Force password reset: If you are not using an active directory implementation, this should be set to true when creating new user accounts. This function forces the user to update the default password upon first login. If you are on an AD implementation this should be left blank or set to false.
Create user account checkbox: Clicking this allows you to turn a person into a user account
Toggle setting control checkbox: This gives you a different view of the user’s forms/locations
When all changes have been made, make sure to press “Submit” - the User Module is not like a form and does not save automatically!
Adding a User via the Add Person Button
This functions the same way as adding a user via the all person search except there is no information pre-populated from your SIS and will need to be entered manually. You can find this button on the main user module listing screen and also when editing a user account. This should only be used to create user accounts for staff who are not able to be added to your SIS - for example most Superintendents, administrative staff, etc.

Deleting Accounts
If you have a user account you need to delete or retire, change the username to “username.retired” or “username.old” prior to deleting. This will allow you to reuse the username in the future if the staff member comes back to the division. To delete an account, simply click on the red X beside their name.

Changing Passwords
If you are using an active directory you are not able to reset the password through clevr, you must reset it within your AD system.
You are able to manually reset a user’s password, however we recommend that you direct them to the forgot password link on the login screen to reset it so that the user is able to be independent. Before doing this, check their account to make sure the correct email address has been added to the email field for that user or they will not be able to reset it on their own.
To change a password, search for the user’s account via the search on the user module homescreen. When you have found their account, click on the key icon to the left of their username to open the change password screen. When changing a user’s password, if you use a default password we recommend opening their account and setting the “Force Password Reset” dropdown to true. This will force them to change their password upon first login.
